「Handmade」interactive felt-book for our toddler

Usually I post about things I make, but this time I have to share the neat little present my mother handmade for her grand daughter (our little girl).  It’s an interactive felt-book to play with and ‘rip out’ different things on each page.

For a closer look on each ‘page’ click “continue reading” below:

Continue reading “「Handmade」interactive felt-book for our toddler”

「Crochet」Baby Birthday Dress

Our little girl is 1 year young today, and I handmade her a special birthday dress!
Technically she is now a toddler and not a baby anymore. However, she’ll always be MY baby, I took the liberty to title this blog post Baby Birthday Dress.

DSCN3245

It’s not my own creation though, I rather followed the instruction of this neat post at craftideas.us. For the colour combination I chose a yarn with different shades of green and for the lower part of the dress I used leftover yarn in this beautiful vibrant pink/purple/white^^^

Continue reading “「Crochet」Baby Birthday Dress”

Smash*Book「Pretty Pink」Update #3

 This double page is very special to me: it’s about my baby daughter!

IMG_1703
I picked this double page to be all about my daughter, because it has the calendar on the bottom of the right page saying “A DAY TO REMEMBER”, so I circled her birthday with a heart.
In addition to that I used adhesive letters to add the birth-month (spelled in the german version with an “i” in the end) and her name, as well as “My Girl” and the meaning of her Japanese name (kanji 七海), “7 seas”

I took polaroids of her, as well as me with her & my husband with her to fill out the page on the left with that. I really like the little frames for the polaroids that I got from a friend. On the page to the right I only added a palm print of hers and will use the empty space to fill it with all the funny, witty, interesting things she’ll say once she can talk (more).

In the middle I attached a little wooden ’ema’ keychain I bought at a Japanese shrine that sort of specialises on wishes & prayers for a good upbringing and education of children.
Something I added in the middle to the “rings” of my smash book are little ‘song cards’ as I like to call them. Basically I got a little crafty and made cards that on the front are decorated according to the theme of the lullaby/children’s song, and have the song lyrics written on the back. They are all  in Japanese lullabies (except for the one on the bottom left which is just the Japanese version of “twinkle twinkle little star”).
IMG_1702

I can’t wait to fill the page on the right with quotes of all the things she says that I want to remember!

´`´`´`´`´`´`´`´`´`´`´`´`´`´`´`´`´`´`´`´`´`´`´`´`´`´`´`´`´`´`´`´`´`´`´`´`´`´`´`´`´`´`´`´`´`´`´`´`´`´`´`´`´`´`´`´`´`
See all my Smash*Book updates HERE

Crochet Mood Blanket 2015 – Update

It’s been a while since I posted an update about my Crochet Mood Blanket 2015. I recently finished the 7th row (each 18 granny squares) and took a picture of how the blanket looks right now..

You can see that most colours are repetitive since I decided on a color code (explained in this blog post) and for the most part I’m going by that, maybe just using 2 or 3 colours if my day has been that mood-swingy 🙂 However there are a few squares that have a completely different colour range, those are special squares because the days were special, for instance my birthday. I really like it that way, because I can spot those special squares immediately and also know right away what they are and why I put them there.

As for the daily crocheting of a granny square it’s going quite well. It’s almost part of my daily routine by now. There was one time where I had to catch up over a few days because we were on a family vacation and I didn’t crochet any squares, but just noted down which colour that day was.

Excited to see how the blanket will look with another few rows added – going to post an update then 🙂


「handmade」Knitted Pink-Purple Sweater

It’s the first time I knitted a piece of clothing for myself. In general I do more crocheting than knitting and did several baby clothing items throughout my pregnancy and after but never  “challenged” myself to make something for myself, until now!
1
This knitting project basically took me about 2 months to finish – I used yarn & needle size 2-3 (EU sizes) but NO PATTERN!!! For measurements I simply used a bought sweater that I knew fits me well and that I liked wearing. I just looked at it constantly while making this and measuring different parts.

I really liked the pink-purple colour-interchanging wool, that has some white sprinkled in here and there to give it somewhat distressed look. I knitted this sweater in 4 pieces – basically only using garter stitch except for the hem and edges.

Starting of with the front I knitted the right and left side of the collar seperately then joined everything on one round needle at the tip of the v-neck there. For the backside I could start with one round needle right away and simply knitting from top to bottom copying the measurements and stitch counts from the front. But I kind of knitted a slope on the right and left shoulder so it would fit more comfortably and hug my shoulders rather than give it a rectangular look. The slope was about as wide as the right and leftside top of the front piece. You can see I joined them together in the following photo.
2
Both arms were knitted in one piece and then joined on the on the bottom side were it matches up with the side-seams of joining front and back. I did pay attention to knitting the arms in the shape of the armhole on the top so it hugs my shoulder-upper-arm-joint nicely.

The hem & edging was simply done in a knit2-purl2 rhythm so make it a bit more stretchty and just giving it a nice visual finishing touch. I think you find that most of the bought sweaters have similar patterns.
3
For the edge on the neckline I decided to first slip stitch with a crochet hook to get a basic line, then half-double crochet around it again. Lastly I did a second half-double-crochet row around that neckline but crochet together every 5th-6th stitch. That way it’s less loose, especially at the tip of the v-neck and around the corners on the shoulers
4

I have to say I’m quite proud about my very first knitted clothing piece for myself. I wasn’t 100% sure I could pull it off  (only 95%, hehe), but I just sat down and started knitting and figured my way from there – step by step.

hand-painted wooden baby walker

My mother-in-law had a wooden baby walker handmade for our little girl as a present. It is supposed to be a little doll carriage but a walker at the same time. She still is some months away from learning how to walk (just learning how to crawl at the moment) but my mother-in-law couldn’t wait and already brought us the walker over. I really liked that it is all wooden, but wanted to add my personal touch and pretty-it up a little by painting it here and there.

LEFT = BEFORE – basic wooden handmade walker & RIGHT = AFTER – with my paint-job donebefore and after

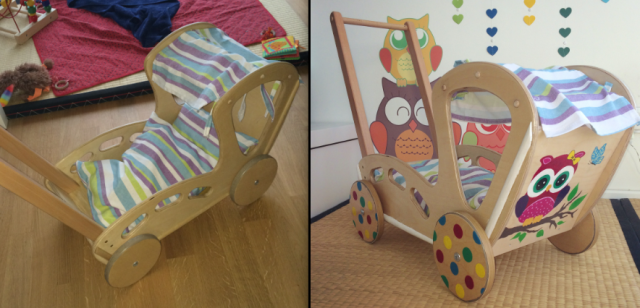
And here are all the painted parts in detail:

1. The Wheels
rad
I decided to just sprinkle medium sized polka dots in 4 different basic colours all over the 4 wheels, and my husband wrapped some vinyl-rubber kind of material around them so they will roll more smoothly.

2. The backside (or front if you look from the opposite direction)
eule
Since owls play a big part in the design of our little girl’s room I just had to paint an owl somewhere on that little walker-carriage. The backside made the perfect canvas so I went all out and even added a butterfly.

3. A little bow
schleife
On the side opposite of the owl, there was a bit of “canvas space” left and I thought a bow work well, but to make a connection to the wheels I painted a polka dot bow!

I also painted the wooden bits on the side that were added as decor (I assume) in white to make them stand out a bit more. After I was done with my paint we sprayed clear varnish all over the walker to protect the paintings and the wood of course.

Here is the finished painted wooden walker doll carriage from front & back
collage.JPG

I’m immensly satisfied with what I did to the walker – it just looks so bright, colourful, cute and unique now, and fits right into the world of our little girl 🙂


Stars on Green – 「handmade」Pyjama

When online shopping at my German ‘craft dealer website’ I came across the wonderful, cheery looking greeen fleece fabric with colourful stars on it. Immediately I though to myself: MAKE A PYJAMA !!!!
So I ordered 3m (about 3.3 yards maybe) to have enough fabric in case I make a mistake, ahem…I didn’t though!

IMG_0826

I took some sweat pants and a sweat shirt I had and used them as pattern. Simply fold them in half back to back nd cut out (after folding your fabric in half as well, of course) and then fold the pants front to front and cut along the edge (giving about 1 inch for seam allowance!!) I sewed an elastic band into the waist-hem of my pants so I’m not losing them 😉

Same procedure for the top of my pyjama: I just folded it in half and with seam allowance cut along the shirt on my fabric – arms, too!

That fleece fabric is sooooooooo soft, inside and out, I can’t wait to fall asleep in that tonight!

Crochet Mood Blanket 2015 – week 1

YAY, the first week of my Crochet Mood Blanket 2015 is done!! It almost has something therapeutic to sit down at the end of each day and crochet a granny square in the mood-fitting colour.

/home/wpcom/public_html/wp-content/blogs.dir/f53/42756151/files/2015/01/img_0652.jpg

It started with the light green square because I was quite determined at the start of the new year (still am!!)

1. determination (personal)
2. blessed & loved with my beautiful baby girl who was in cuddle mood
3. productive making a little something for a friend
4. HAPPY (highlight of my week) at baby swimming class ❤
5. a little worried, a little pensive, a little chaotic (personal)
6. mildly grouchy & upset about husband taking down the Christmas tree – I love those lights!
7. feeling okay ….

Since I will have 18 squares go across, next weeks part will be joined right onto this first week. Quite exciting to see all the blocks come together!